...
| Table of Contents |
|---|
Internet
When you install the add-on in JIRA® Cloud, a Configure button appears in the Administration / Add-ons / Manage Add-ons / Svn Gateway
...
- Nick name: Allows you to differentiate between your different repositories, if you have more than one [optional].
- Subversion URL: complete path to your subversion repository.
- Username: the username to access the SVN repository
- Password: the password of that user to access the SVN repository.
- Subversion Viewer URL: this is the prefix to add before the revision number, to access your SVN viewer. Many SVN hosting system incude include a way to see details of a revision. We will add this complete URL and follow it with the revision number so that you can quickly access your SVN changes [optional].
Note: If you have a repository on the Internet, in which some access rules restrict access based on IP addresses, you should add the following IP addresses:
- 37.59.47.189
- 198.27.68.25
- 91.121.93.34
- 188.165.225.15
- 188.165.213.157
to the list of authorized IP addresses
...
You will have to install a small Java program (SvnFeeder) to poll the Subversion server and send the commit comments and list of files to Svn Gateway.
The configuration is done in a simple XML file:
Single repository
| Code Block | ||||
|---|---|---|---|---|
| ||||
<svn_feeder_configuration>
   <svn_repository key='ip...21' stop_on_copy='1' first_rev='-1'>
       <url>https://xxx.example.com/svn_dev</url>
       <username>xx</username>
       <password>xx</password>
   </svn_repository>
</svn_feeder_configuration> |
Note that the key (ip...21 in the markup above) has to be replaced by the key assigned to your repository in the Repository Settings screen above.
Optional attributes:
- stop_on_copy: set to 1 or 0. For details about usage, please refer to Subversion documentation
- first_rev: Use this attribute if you only want to have the last part of a branch to be used for the synchronization. If the attribute is not present, SvnFeeder will take the whole branch
...
SvnFeeder is launched with the following command:
| Code Block | ||||
|---|---|---|---|---|
| ||||
java -jar SvnFeeder.jar -c configfile [-loop][-reset][-cmdLine] |
Optional arguments
- -loop: when specified, SvnFeeder will stay in memory and run an update every minute
- -reset: if specified, SvnFeeder will start by requesting Svn Gateway to remove all known data about the repositories described in this configuration file.
This is useful if you change from one repository to another, or from a trunk to a branch - -cmdLine: if specified, instructs the feeder to use the command line svn command instead of the built-in (Java) library
Subversion 1.9
The Svnkit Java library that is linked with SvnFeeder is not compatible with Subversion 1.9 or higher.
If this is your case, you have to use the -cmdLine argument as described above, so that SvnFeeder calls the local command-line client program, which must be compatible with your subversion server.
Linux / Mac OS/X
Here are the steps to install SvnFeeder under Linux or Mac OS/X:
- Ensure you have Java 7 or higher installed
- Download SvnFeeder.zip
- Create a folder for installation
- Unzip SvnFeeder.zip content in that folder
- Edit the configuration file
Run the feeder:
Code Block java -jar SvnFeeder.jar -c configfile -loop &this will run the SvnFeeder in the background, and update Svn Gateway every minute. Then you can call this script from /etc/rc.local for example under Linux.
You can also use the post-commit technique to launch this tool only after each repository commit.
See a description of the steps below on this page
...
If you chose to use the Intranet mode, the configuration file you write will then look like this:
| Code Block | ||||
|---|---|---|---|---|
| ||||
<svn_feeder_configuration>
   <svn_repository key='ip...21'>
       <url>https://xxx.example.com/svn_dev</url>
       <username>xx</username>
       <password>xx</password>
       <nick>Dev</nick>
       <svn_viewer>http://10.0.0.45/SvnViewer/svn_dev/rev/</svn_viewer>
   </svn_repository>
   <svn_repository key='ip...21/2'>
       <url>https://xxx.example.com/svn_marketing</url>
       <username>xx</username>
       <password>xx</password>
       <nick>Marketing</nick>
       <svn_viewer>http://10.0.0.45/SvnViewer/svn_marketing/rev/</svn_viewer>
   </svn_repository>
</svn_feeder_configuration> |
The same optional attributes described above can be used for each repository
...
If you want the force your users to enter a commit comment containing a valid JIRA issue key in each commits, you can do so by using the following recipe
Note that our customers only experienced this with a Linux installation, as described in this tutorial. We can work with you if you need to do this under Windows.recipes:
Add this code to the pre-commit file on the subversion server:
For Linux:Code Block REPOS="$1" TXN="$2" TMP=`mktemp` /usr/bin/svnlook log -t $TXN $REPOS > $TMP java -jar /pathtosvnfeeder/SvnFeeder.jar -c /pathtoconfigfile/configFile -checkjira "$REPOS" "$TMP" || exit1For Windows with VisualSVN (code contributed by Antenor):
Code Block set REPOS=%1 set TXN=%2 set SVNLOOK="%VISUALSVN_SERVER%\bin\svnlook.exe" set SVNFEEDER= "pathtosvnfeeder\SvnFeeder.jar" set FEEDERCONF= "pathtoconfigfile\SvnFeederConfig.xml" set TEMP=%VISUALSVN_SERVER%jira%TXN%.log %SVNLOOK% log -t %TXN% %REPOS% > "%TEMP%" java -jar %SVNFEEDER% -c %FEEDERCONF% -checkjira "%REPOS%" "%TEMP%" if %errorlevel% gtr 0 (goto error_exit) else goto normal_exit :error_exit del "%TEMP%" exit 1 :normal_exit del "%TEMP%" exit 0
where:- pathtosvnfeeder is the absolute directory to the SvnFeeder java program
- and pathtoconfigfile the absolute directory to the SvnFeeder configuration file.
- If at least one of such key is found the commit is accepted
- otherwise it is refused.
If you have want to restrict the choice of JIRA projects to only a list of projects, you can add the following XML element in the configuration file:
Code Block <svn_feeder_configuration> <pre_commit projects='X,Y,Z' /> <svn_repository key='ip...21'> ... </svn_repository> </svn_feeder_configuration>with X,Y,Z the list of projects you want to allow. All other projects will not be accepted. If a commit contains at least one of the authorized projects's existing issues, the commit will be accepted.
If you have many repositories, with one or more JIRA project matching each repository, you can add the following marking in the configuration file to specify the correspondence:
Code Block <svn_feeder_configuration> <svn_repository key='ip...21'> <pre_commit projects='X,Y,Z' local_svn='pathtosvn' /> ... </svn_repository> </svn_feeder_configuration>Note that in this case the pre_commit element is inside the svn_repository element. You can specify different pre_commit elements for every subversion repository.
In order for the matching to work, you also need to add the local_svn attribute: it must contain the server local path to the repository
One of our customers has 40+ repositories, and one JIRA project for each repository. They just added a pre_commit element to each of their repository to ensure that commits cannot be done to the wrong project.Restriction on JIRA status: you can also add that only some JIRA issues status are accepted when you commit.
This is also done with a pre_commit XML element but this time with the status attribute:Code Block <svn_feeder_configuration> <pre_commit projects='X,Y,Z' status='Open,In Progress' /> <svn_repository key='ip...21'> ... </svn_repository> </svn_feeder_configuration>In this case, only the issues with status Open or In Progress are accepted by the pre-commit. The status attribute is independent of the projects attribute. Both can be specified globally or by project.
- If you have other special requests for the pre-commit rules, we can probably manage to implement them, don't hesitate to come back to us.
...
You can use SvnFeeder in a smarter way than the -loop attribute that will ping the subversion server every minute.
Add this code to the post-commit file on the subversion server:
| Code Block |
|---|
java -jar /pathtosvnfeeder/SvnFeeder.jar -c /pathtoconfigfile/configFile |
...
where:
- pathtosvnfeeder is the absolute directory to the SvnFeeder java program
- and pathtoconfigfile the absolute directory to the SvnFeeder configuration file.
...
Another way to feed our add-on is to send the commit details through a small REST API.
This will allow you for example to send data only on post commit hooks instead of the 1 minute polling.
Ask us to have access to the API definition.
Downloads
The Java program to install is here:
| View file | ||||
|---|---|---|---|---|
|
it works under Windows, Linux, OS/X.
There is an alternative for Windows users, as a Windows installer:
| View file | ||||
|---|---|---|---|---|
|
How to use Svn Gateway when it has been configured
The link between JIRA and subversion is based on the commit comments: you need to add the ID of the JIRA issue.
The commit comment can contain any number of JIRA issues, and they can be anywhere on the comment.
All the following links will be recognized:
- WEB-123
- WEB-234: fixing bug
- WEB-456, WEB457: remove bad code
- Fixing nasty bug described in SERVER-123
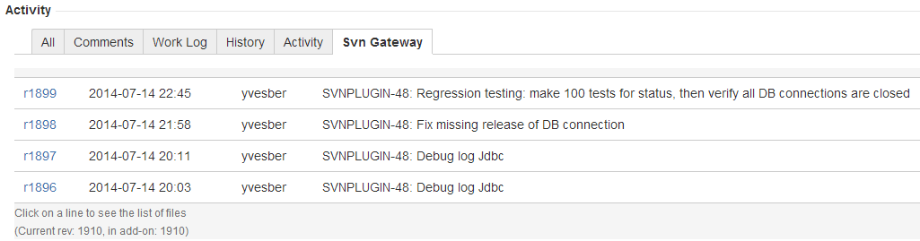
The links between the JIRA issue and the SVN commits is listed in the Svn Gateway tab:
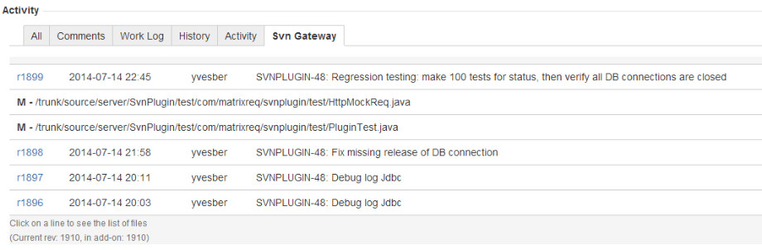
When you click on a commit, the list of files is shown:
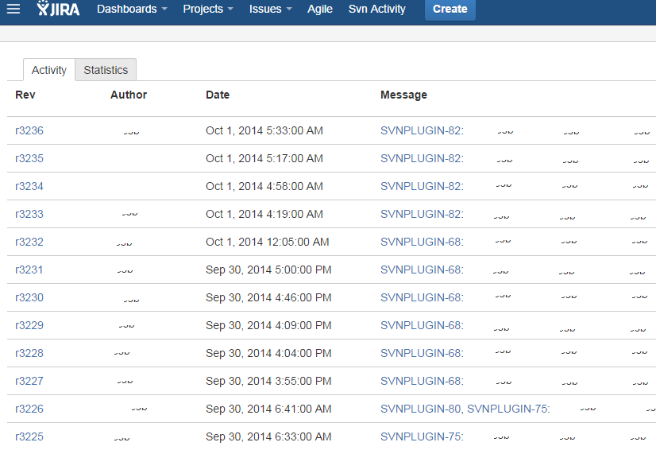
You can also use the Svn Activity Screen button at the right of the screen: this gives you access to the whole list of commits, more recent first:
HELP / Contact
Don't hesitate to contact us to assist in the installation.
- Email:MatrixRequirements Support
 support@matrixreq.com